How To's
Find out how to set PTR records or unblock IP addresses.
- Manage PTR Records
- Unblock IP addresses (SPAM and HACK)
- Run an RBL check
- Bulk Update PTR Records
- Move IP Block's Between Servers
Manage PTR Records
Overview
PTR (pointer) is reverse DNS: the name the internet sees when something looks up your public IPv4 address. Many mail servers and some services expect your PTR to look professional (often a fully qualified domain name, or FQDN, such as mail.example.com).
For mail and reputation, it is best practice that PTR and forward DNS agree: the IP’s PTR should point at a hostname that, in turn, resolves forward (A record) back to the same IP. If they do not match, some recipients may defer or reject mail or treat the host as less trustworthy.
You manage PTR in the NOC portal on IP Address Management for addresses on your account. You cannot set PTR for IPs you do not own through this page.
Before you change anything
- Decide on the hostname you want (an FQDN you control).
- Create/update forward DNS so that the hostname’s A record points to this same IPv4. Do this in your DNS hosting (zone for the domain), not only in the portal.
- Wait for DNS to propagate if you just created the record (often minutes, sometimes longer).
- In the portal, open IP Address Management, find the IP (search, service filter, or Ctrl+K), and expand the row or use Update reverse DNS where offered.
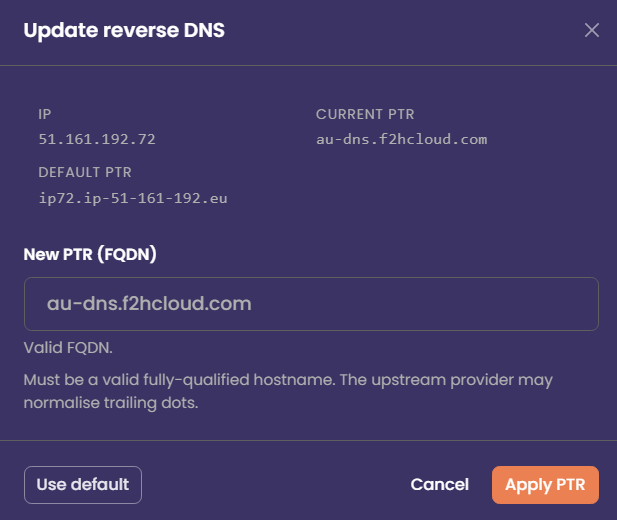
Set a custom PTR (single address)
- Open the IP’s PTR flow (expanded row, Save after editing the PTR field, or the Reverse DNS modal).
- Enter the new PTR as a valid FQDN (e.g.
smtp.example.com). Do not use bare words likemailwithout a domain; the portal expects a proper hostname format. - Confirm the value matches what you want the world to see and that your forward DNS (A) for that name already points to this IP.
- Click Apply PTR / Save. The portal sends the change to the API; the upstream API system may normalise the name slightly (e.g. trailing dot).
- After a few minutes, verify with an external tool (reverse lookup on the IP) or
dig -x YOUR.IPfrom your own machine.
Reset PTR to the default
- Open the same IP in IP Address Management.
- Use default (modal) or Reset (expanded row), depending on which UI you are in.
- Confirm the action. The PTR returns to the platform default for that service/IP.
- Allow a short time for the change to appear globally, then verify with a reverse DNS lookup if needed.
Use this when you no longer host mail on that IP, you used a temporary hostname, or a custom PTR is causing mismatch warnings.
Bulk PTR updates
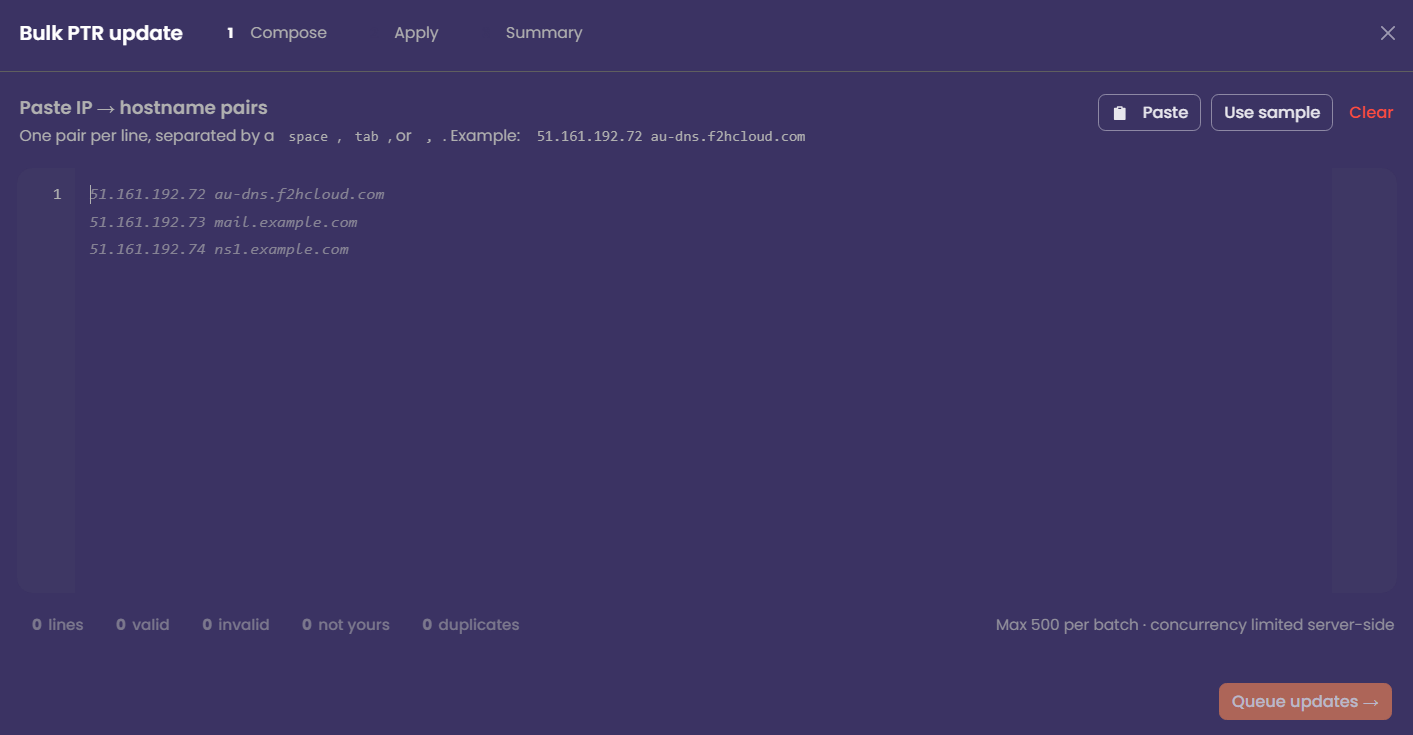
If you must align many addresses at once (e.g. after a migration), open Bulk PTR update, paste one IP and hostname per line (separated by space, tab, or comma), and review the counts for valid, invalid, and not yours before queuing. Only lines for your IPs are applied. The maximum batch size is 500 per run; large jobs are completed in a queue with a summary at the end.
Troubleshooting
Quick checklist
- Forward A (or appropriate record) points hostname → this IPv4
- PTR in the portal is set to that same hostname (FQDN)
- Verified with an external reverse lookup after propagation
Unblock IP addresses (SPAM and HACK)
Overview
We register and operate public IP ranges for customer services. When an address sends mail or traffic that looks like spam, bulk abuse, or compromised-system behaviour, blocklists and peers can flag our whole network, not just one server.
So we run automatic protections and sometimes restrict outgoing mail (for example, blocking SMTP on port 25 from that address) until the problem is understood and fixed. That protects you, our other customers, and deliverability for everyone on our platform.
SPAM-type blocks usually mean our filters saw messages leaving your server that scored like junk: content, volume, bad list hygiene, weak authentication, or a compromised mailbox/script relaying mail you did not intend.
HACK-type blocks mean the traffic pattern looks like abuse from a broken or attacked machine: malware, open relay abuse, scanning, brute-force egress, or similar — not “we didn’t like your newsletter wording” alone.
Before you click “Unblock”
Unblocking is not a reset button. If the cause is still there, you will often be blocked again, sometimes longer or with stricter review.
If this were flagged as SPAM
- Stop mail leaving that server — stop or disable the MTA (Postfix, Exim, Sendmail, etc.) until you know what happened.
- Drain the queue — inspect and clear stuck mail so nothing fires out the moment you lift the restriction.
- Trace the Message-ID (from our alert email, if we sent one) in your logs to see which messages triggered the block.
- Fix the cause — compromised account, misconfigured site form, newsletter tool without unsubscribe, open relay, weak authentication, missing PTRs, etc.
- Only then, use Unblock SPAM in the NOC.
If this were flagged as security abuse
- Stop the abusive activity — isolate the host if needed.
- Patch, rotate passwords/API keys, remove malware, close exposed services, and review firewall rules.
- Only then use Unblock HACK (or the equivalent security unblock action) in the NOC.
Unblock in the NOC (IP Address Management)
- Sign in to the NOC and open IP Address Management.
- Find the IPv4 (search, filters, or quick search).
- Expand the row.
- Choose Unblock SPAM or Unblock HACK as appropriate.
- Wait a few minutes; network changes are not always instant.
You can only unblock addresses that belong to your account. If a button is missing or the request fails, the IP may not be in your inventory, or the block type may require a support ticket with evidence of remediation.
What you should do so you don’t get blocked again
Mail authentication & identity
- Set correct SPF, DKIM, and DMARC for the domains you send from.
- Set PTR (reverse DNS) to a hostname that matches forward DNS (A/AAAA) for the same IP — see your PTR guide.
- Prefer authenticated submission (587 / 465)** with real credentials**, not anonymous relay paths.
Content & sending behaviour (why “legitimate” mail still trips filters)
- Avoid spammy patterns: all caps subjects, heavy promo language, many links vs little real text, embedded scripts, “too good to be true” offers.
- For any bulk or marketing mail: clear From, honest Subject, and a working unsubscribe for people who didn’t ask or changed their mind.
- Warm up new IPs and don’t blast cold lists from a fresh server.
Volume & operations
- Very high outbound volume: use dedicated sending IPs, keep abuse@ (or similar) monitored on that domain/range, and don’t mix many unrelated brands on one sending identity unless you know the risk.
After you unblock
- Send a small test and check headers and blocklist/diagnostic tools.
- If you’re blocked again quickly, assume remediation was incomplete — do not unblock in a loop without fixing logs and queue first.
If you think it’s a mistake
If you’re sure the traffic was legitimate and authentication and content follow normal standards, open a support ticket with:
- The IP
- Approximate time of the block
- Sample message headers (or Message-ID from our alert) for the mail we classed as problematic
We’ll review whether it was a false positive and what to adjust.
Run an RBL check
Overview
IP Reputation takes time. You, as the owner of an IP address, are responsible for its reputation from the moment the IP is assigned to you.
An RBL (Real-time Blocklist / DNS blocklist) check asks public blocklist providers whether your public IPv4 is listed. Many mail systems use these lists to decide whether to accept mail. The check in the NOC is a quick, on-demand snapshot — useful when you are troubleshooting delivery or confirming reputation after a cleanup.
It is not a full mail-audit or a guarantee that every recipient will accept your mail. Large providers also use their own filters, spam scores, and authentication checks (SPF, DKIM, DMARC, PTR).
Where to run it
- Sign in to the NOC.
- Open IP Address Management.
- Find the IP (search box, service filter on the left, or Ctrl+K quick jump if your browser supports it).
Run the check
To run an RBL check on your IP address.
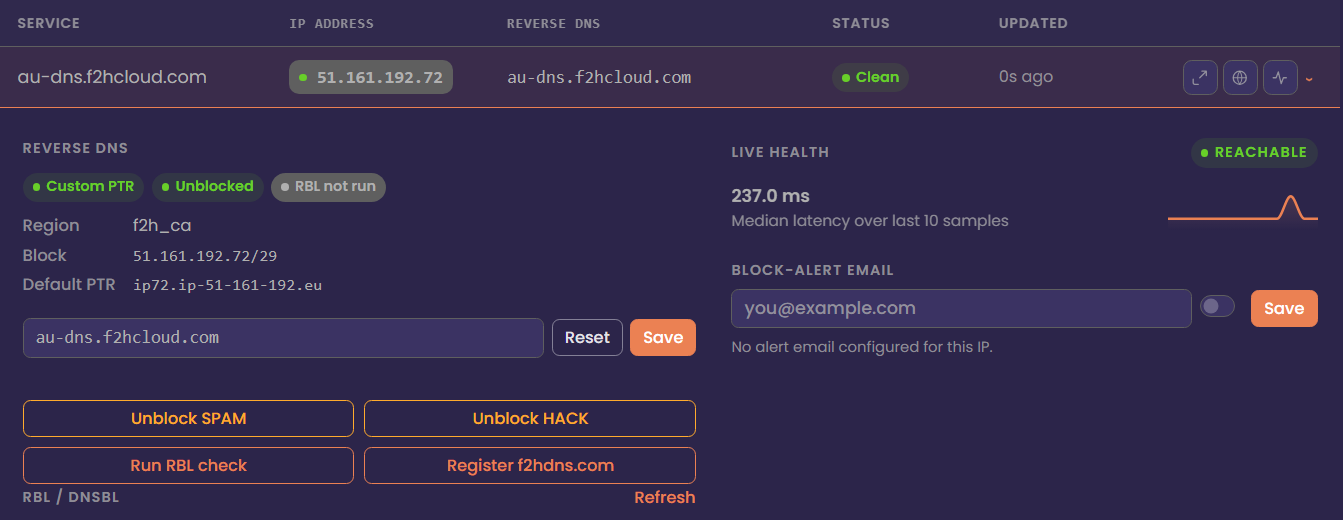
From the table (quick action)
Click the RBL icon on the row for that address. The UI will request a fresh check for that IP.
From the expanded row (detail)
Click the row to expand the per-IP panel, then use Run RBL check. Use this when you already have PTR, unblock, or another context open for the same address.
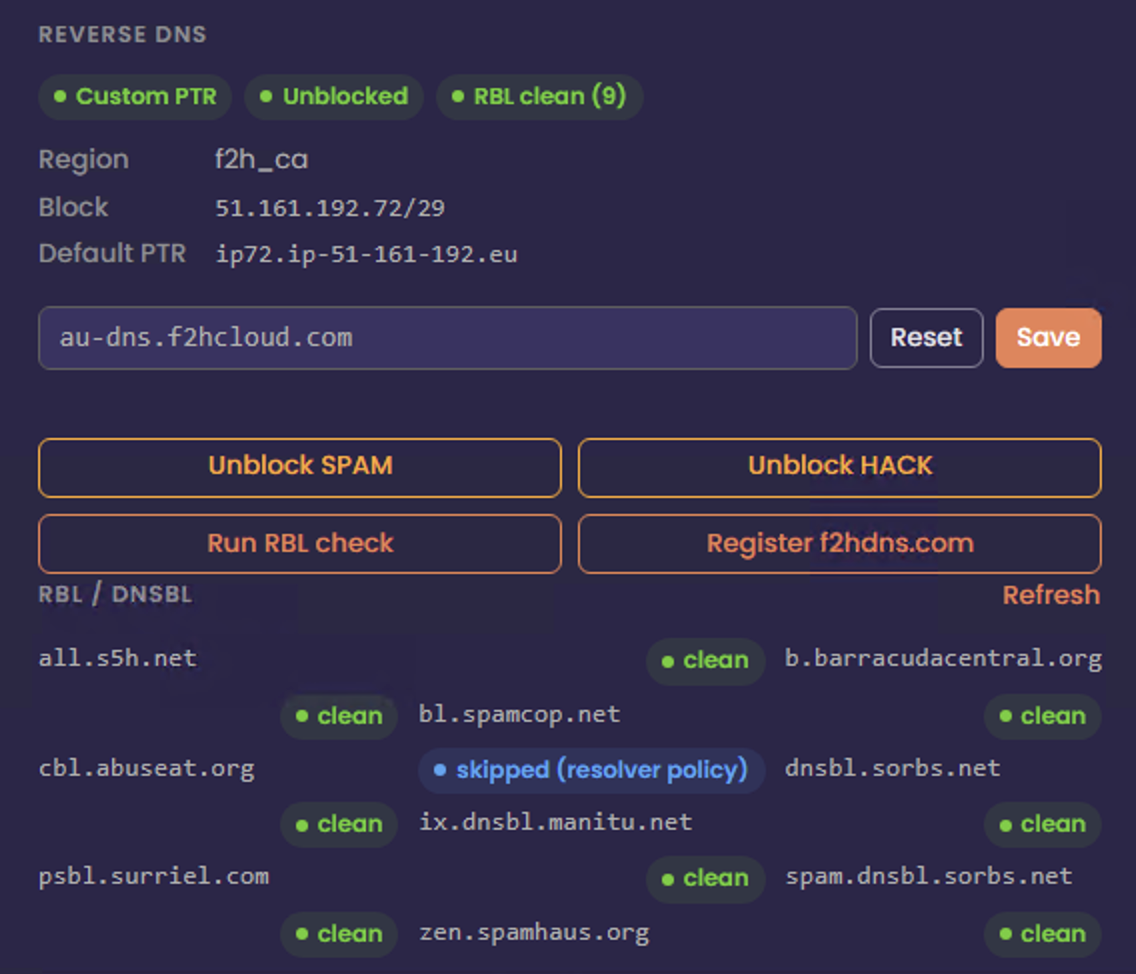
Read the result
- If the address is not on the lists we query, you will see a clean / no listing style result (wording may vary slightly in the UI).
- If it is listed, the UI shows how many lists reported a hit and may summarize severity.
{
  "status": "ok",
  "ip": "51.161.192.72",
  "rbl": {
    "zen.spamhaus.org": "ok",
    "b.barracudacentral.org": "ok",
    "bl.spamcop.net": "ok",
    "psbl.surriel.com": "ok",
    "dnsbl.sorbs.net": "ok",
    "spam.dnsbl.sorbs.net": "ok",
    "all.s5h.net": "ok",
    "ix.dnsbl.manitu.net": "ok",
    "cbl.abuseat.org": "policy"
  },
  "detail": {
    "cbl.abuseat.org": "127.255.255.254 (Error: open resolver; https://check.spamhaus.org/returnc/pub/158.69.169.2/)"
  },
  "summary": {
    "total": 9,
    "listed": 0,
    "errors": 1,
    "policy": 1,
    "clean": 8
  }
}
Results update the RBL summary chips at the top of the page and badges on rows so you can spot problem IPs at a glance.
Bulk Update PTR Records
Overview
Use Bulk PTR update when you need the same kind of change on many IPv4 addresses at once — for example, after a migration, when standardising hostnames for mail servers, or aligning reverse DNS across a range. Single-address changes can stay in the normal row editor or PTR modal.
Before you start
- Each PTR must be a valid FQDN (for example
mail.example.com, not a single word without a domain). - Best practice: the hostname you set should have forward DNS (usually an A record) pointing to that same IP, so forward and reverse match.
- Only IPs that appear under your account in IP Address Management can be updated. Anything else is rejected as not yours.
- Maximum 500 IP → hostname pairs per batch. If you have more, split into multiple runs.
Open the bulk tool
- Sign in to the NOC.
- Open IP Address Management.
- Click Bulk PTR update (toolbar at the top of the main table).
Step 1 — Compose
- In the editor, paste one pair per line.
- On each line, put the IPv4 first, then the hostname, separated by a space, tab, or comma.
Example:
203.0.113.10 mail.example.com
203.0.113.11 smtp.example.com
203.0.113.12,ns1.example.net- Use Paste if you are copying from a spreadsheet or text file. A sample can show the expected shape if you are unsure. Clear wipes the editor.
- Watch the line counts at the bottom: valid, invalid, not yours, duplicates.
- Fix invalid lines (bad IP or bad hostname shape).
- Remove or correct lines marked not yours.
- Duplicates: only one update per IP should win; clean extra lines if the count surprises you.
- When you have at least one valid owned line, and you are ready, continue to the next step (Queue updates or equivalent).
Step 2 — Apply
The NOC queues each change and applies it with limited concurrency (server-side). You will see:
- A progress bar and counts for queued, running, succeeded, and failed.
- Optionally cancel remaining if you need to stop mid-run.
Do not close the browser tab until the run finishes unless you accept that some rows may still be in flight.
Step 3 — Summary
Review updated, failed, and cancelled counts and duration.
- Retry failed only — runs again for lines that errored (after you fix the underlying issue if needed).
- Copy failed as CSV — handy for support tickets or a second attempt in a spreadsheet.
- Close when you are done.
Verify
PTR and DNS propagate at different speeds everywhere. After a successful run:
- Use your usual reverse DNS lookup (or
dig -x/ online checker) on a few addresses. - Confirm A records still match the names you set.
Common issues
Tips
- Sort and dedupe your source file before pasting to avoid duplicate IP lines.
- For a cutover, update forward DNS first, then bulk PTR, or do both in close sequence and recheck.
- Keep a copy of the file you pasted — the summary’s export CSV is best for failures, not always a full audit of successes.
Move IP Block's Between Servers
Overview
Currently, you can move IP blocks between Dedicated Servers only. IP blocks cannot be moved between virtual servers.
We provide two types of IP subnets: Fixed and Failover.
Fixed subnets are routed directly to your server, and you do not need to reserve any addresses in the block for broadcast or gateway purposes. Although the term fixed is used, this does not mean the block is permanently tied to a single server. If you have two or more compatible services, you can move a fixed IP block between them as needed.
Failover subnets are typically placed into a vRack, which allows the IPs to be attached to multiple servers at the same time. Unlike a fixed IP block, which can only be routed to a single server at once, failover IP blocks are designed for high‑availability (HA) setups. Failover subnets can only be assigned to servers that are compatible with HA/vRack networking.
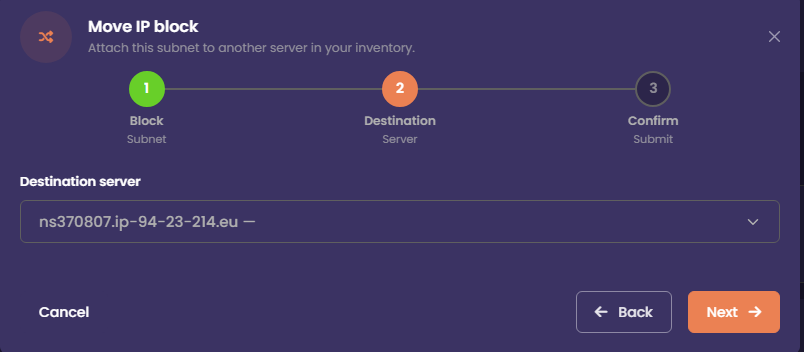
Move an IP Block
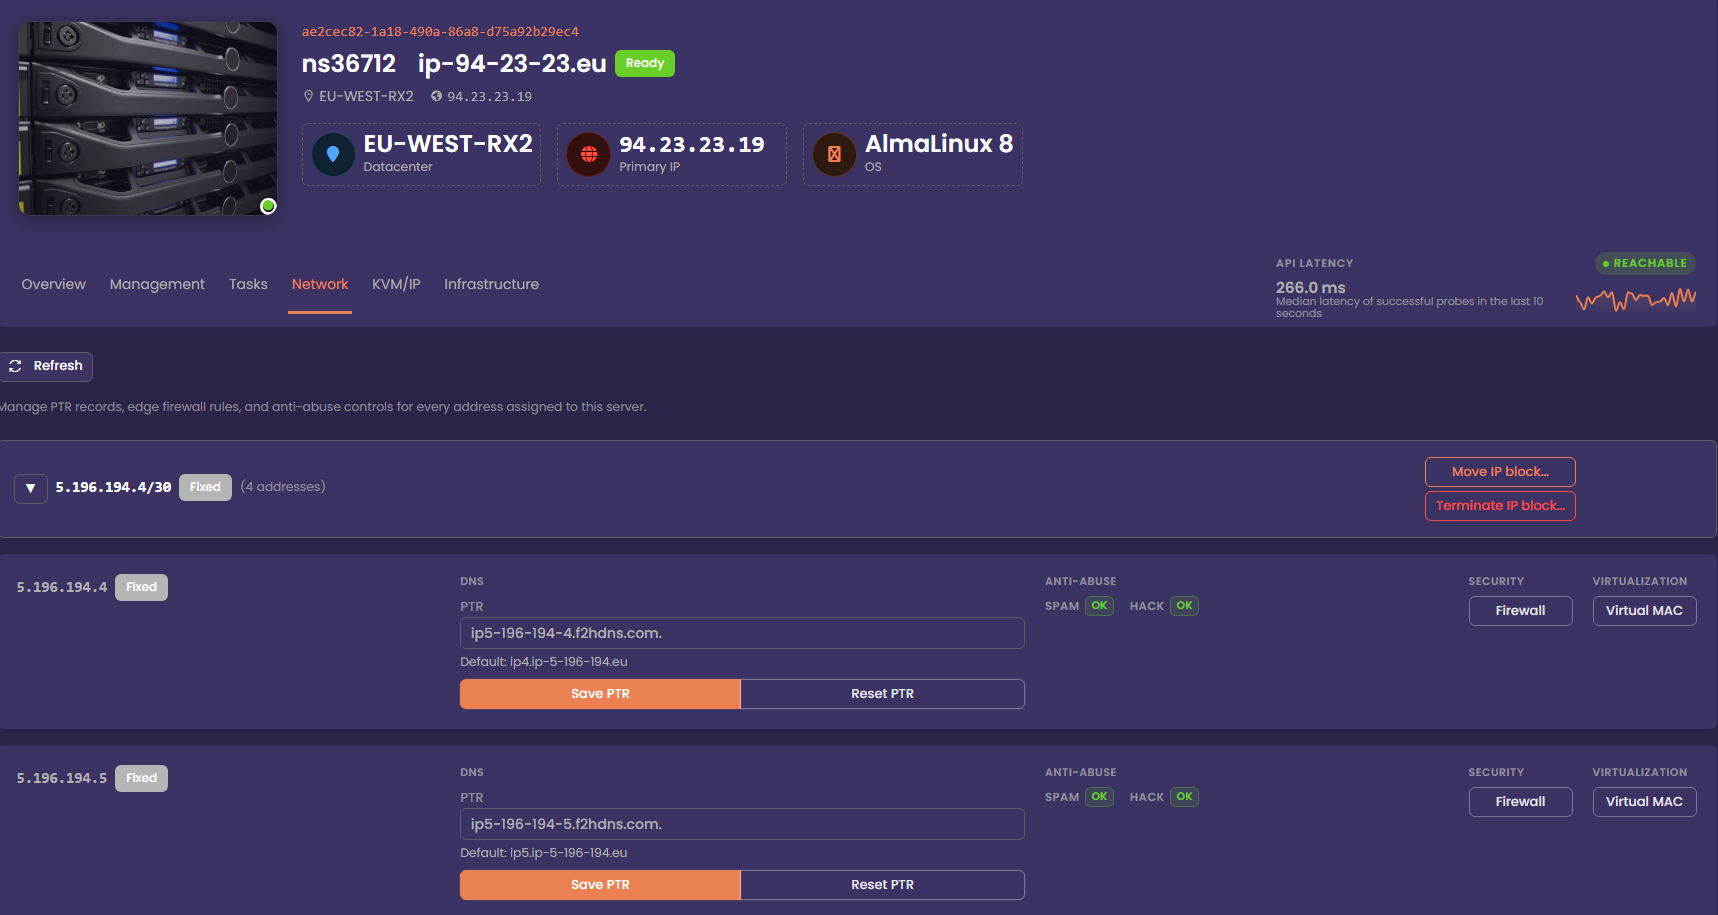
To move the IP block to another compatible service, click Move IP Block. In the modal that appears, select the server you want to attach the IP block to, then confirm the change. The dropdown will only display servers that are eligible to receive the IP block. In most cases, this means other servers within the same region, though they do not need to be in the same datacentre.
You cannot move an IP Block with vMac's assigned to it. Delete any vMac's before attempting to move an IP Block
After you confirm the move request, a message will appear indicating that the IP block migration has been received. The IP block will be moved to the selected server within 5 minutes, and it will then appear under the Network tab for that server. The associated IP Addon in your client area will also be updated to reflect the new service.
Monitor Progress
The migration task will appear on the server that is losing the IP block. Once the block has been successfully moved to the receiving server, the task will update to Completed. At that point, the Network tab on the receiving server will display the IP block.
