Introduction
It's your NoC. The place to manage F2HCloud services
The NoC
Your NOC is the central place to manage your Dedicated Servers and IP subnets. While the platform is still under active development, please report bugs to the support team or your account manager.
Introduction
Hello...
Welcome to your Network Operations Centre (NoC)
The NoC has been developed over the past twelve months with a primary focus on providing customers with a modern, streamlined way to manage Dedicated Servers purchased through First2Host or any of its affiliates. It brings together everything a server administrator needs — from essential day‑to‑day server management to advanced features such as high‑availability networking and internal routing controls.
Overview
Access
We use Single Sign‑On (SSO) to provide controlled and audited access to systems outside of my.f2h.cloud. With SSO enabled, you only authenticate once — if you are already logged into my.f2h.cloud, you will not be asked for your password again when accessing linked services.
To generate and activate a session for https://noc.f2h.cloud, simply navigate to the URL and select “Login With F2HCloud SSO.” Your existing session will be used automatically.

NoC Dashboard
Your NoC dashboard provides an at‑a‑glance overview of all services that are compatible with The NoC. From here, you can quickly access and manage supported Dedicated Servers, Virtual Servers, and Cloud Servers. The NoC also allows you to manage IP blocks assigned to your virtualised services directly from the dashboard.

NoC Ordering
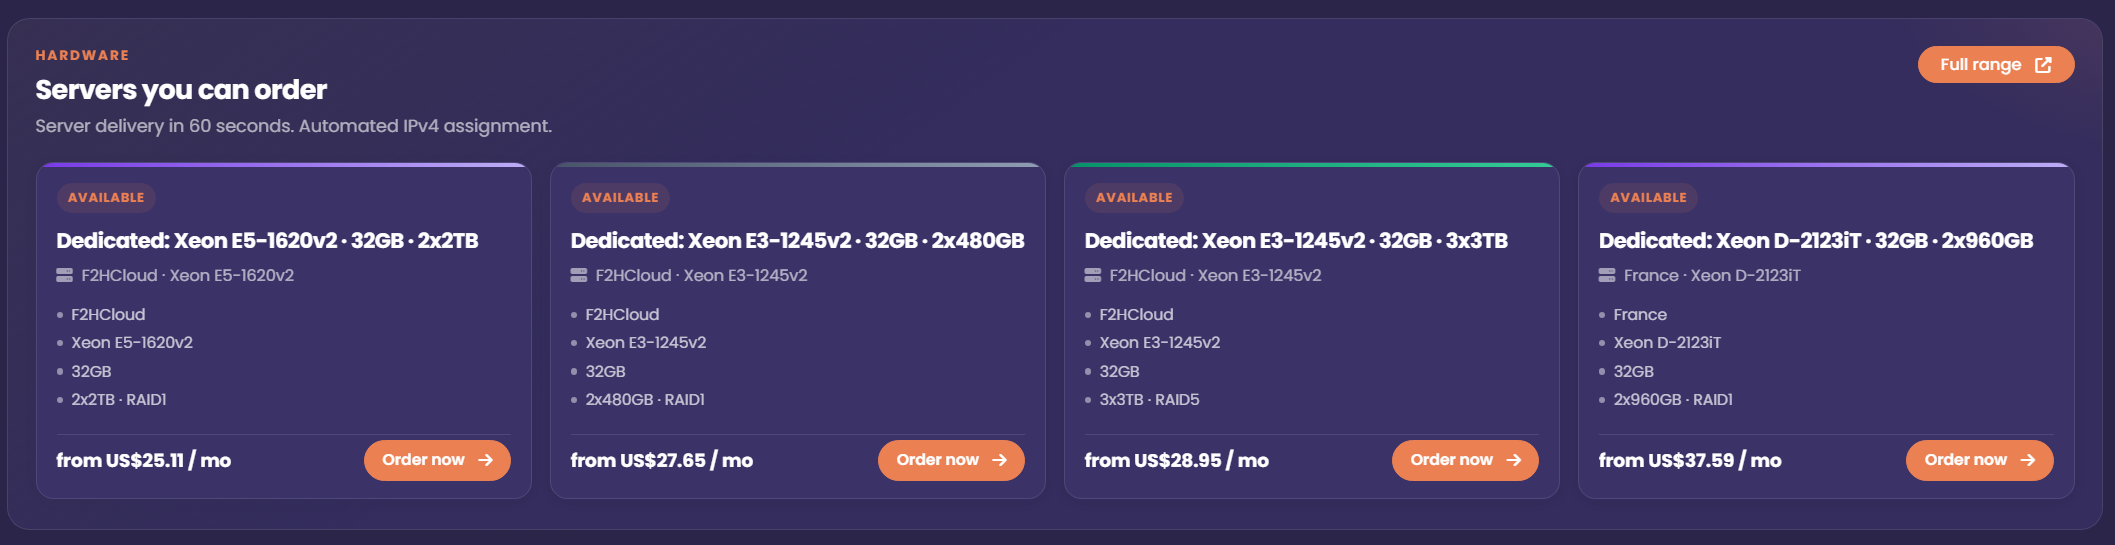
The NoC supports live server ordering. Your dashboard displays a real‑time snapshot of current Dedicated Server availability, and any server shown as available can be deployed within 60 seconds of payment. If you order additional IPv4 addresses or subnets during checkout, these will also be delivered automatically as part of the provisioning process.
Server Management
Management Tab
From the Management tab, you can control every operational aspect of your Dedicated Server. Each action performed in the NoC triggers an authorised API request to the connected API server. These requests are processed in real time, and the results are reflected instantly on the page without needing to refresh.

Using the following features will cause your server to reboot. If your server is in production, ensure an appropriate maintenance window has been agreed upon before proceeding.
Reboot
Using the Reboot function sends a hard reboot request to the API server, which then forces an immediate restart of the machine. This action is the equivalent of pressing the physical power button on a PC.
Rescue
Using Rescue Mode temporarily adjusts the BIOS settings on your server so it boots from a lightweight network image pre‑installed with Debian. Once the system loads into the rescue environment, you can access the console, list the drives attached to your server, and mount them for inspection or repair.
Reset Root Password
Using the Reset Root Password function attempts to reset the server’s root password. You will be prompted to enter a new password, which will then be applied to the system. During this process, the server may reboot and may temporarily enter Rescue Mode.
Reveal Last Root Password
If you have installed an operating system through The NoC or used the root password reset feature, we store a copy of the last known working root password within your client area. The password is encrypted at rest and decrypted only when you use the Reveal Last Root Password function. This process is fully automated and monitored.
Reinstall
At the bottom of the Management tab, you’ll find a list of all operating systems compatible with your server. This list is generated dynamically based on your server’s hardware, as newer operating systems may not function correctly on older platforms.
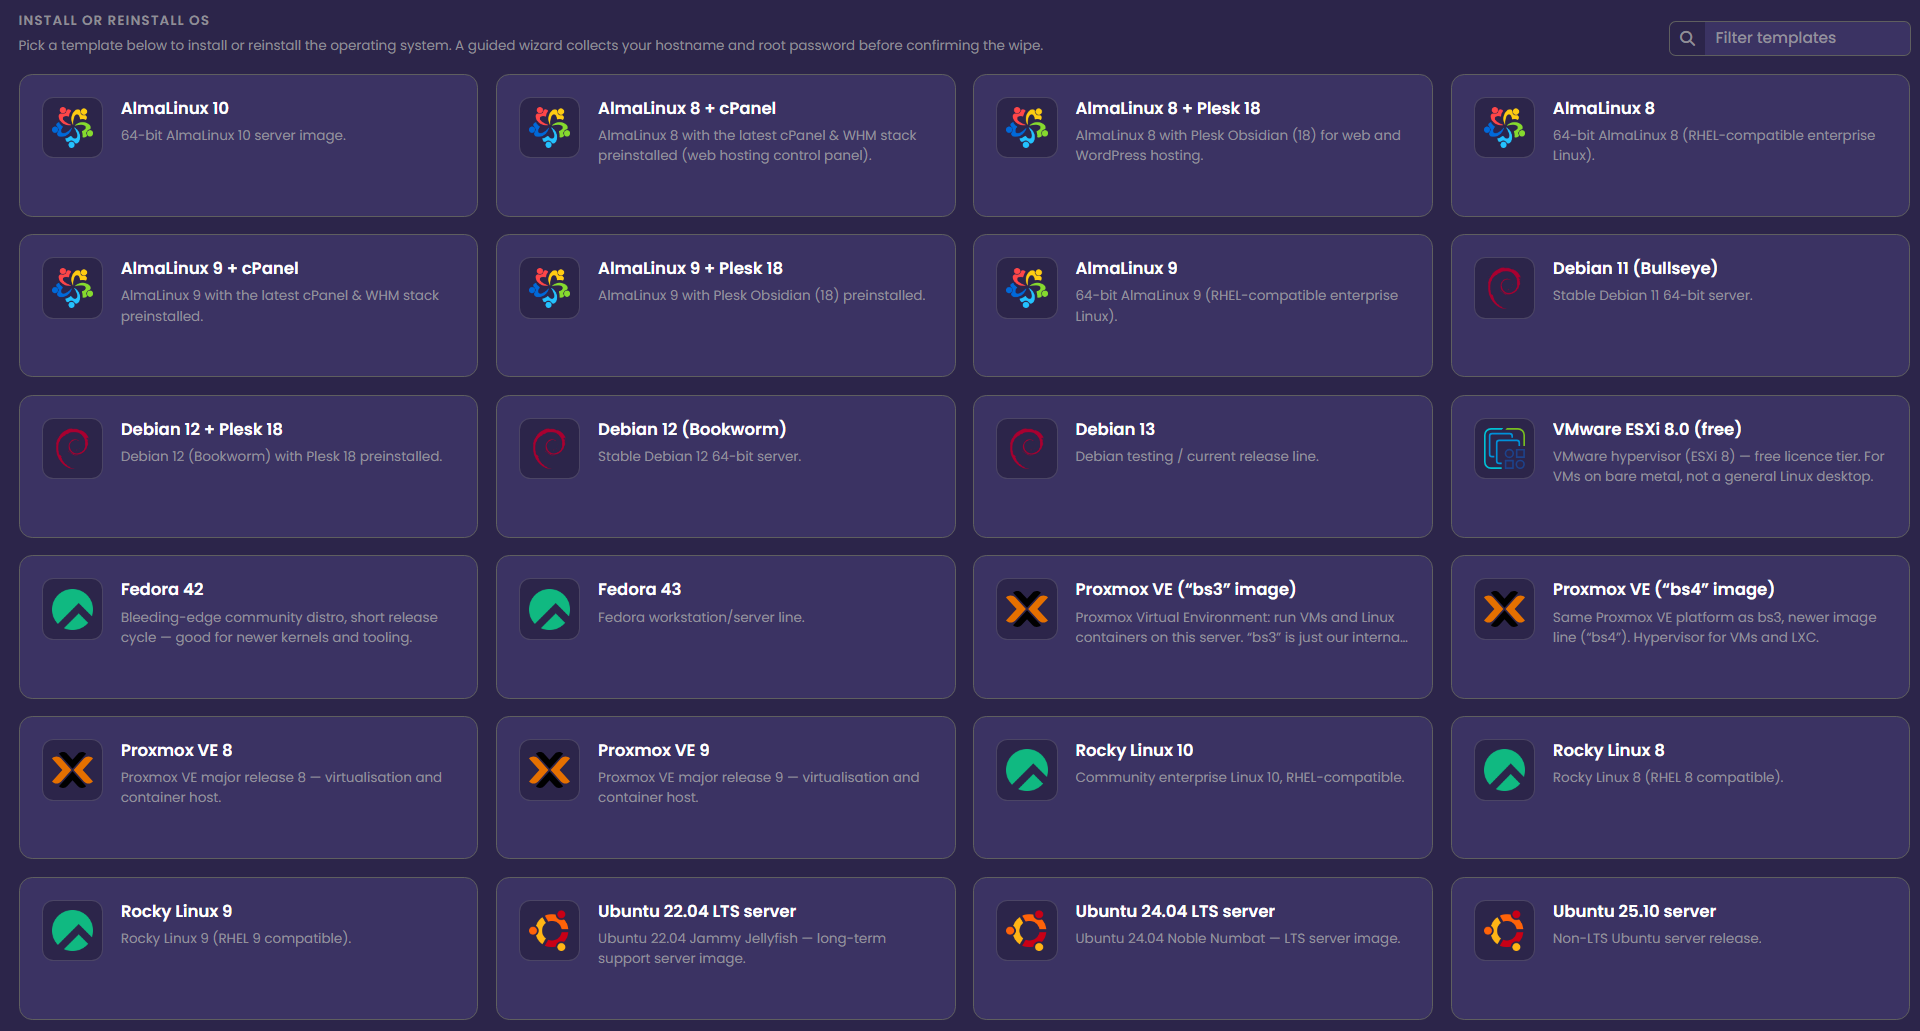
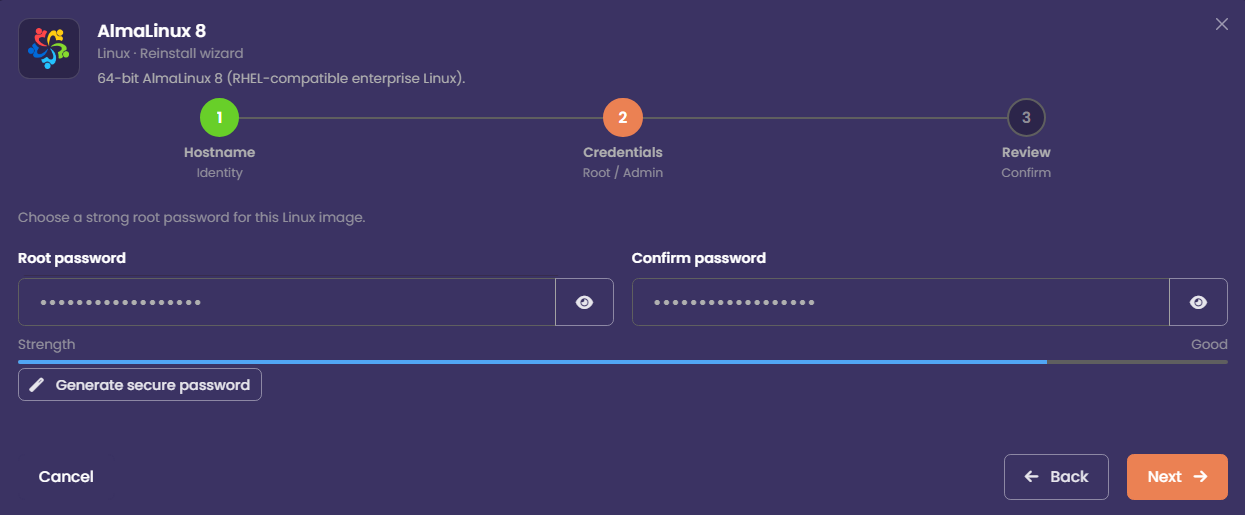
During the installation process, you’ll be asked to choose a hostname for your server (this is optional) and to specify a root password. Once confirmed, the installation will begin and all existing data on the server will be permanently erased.
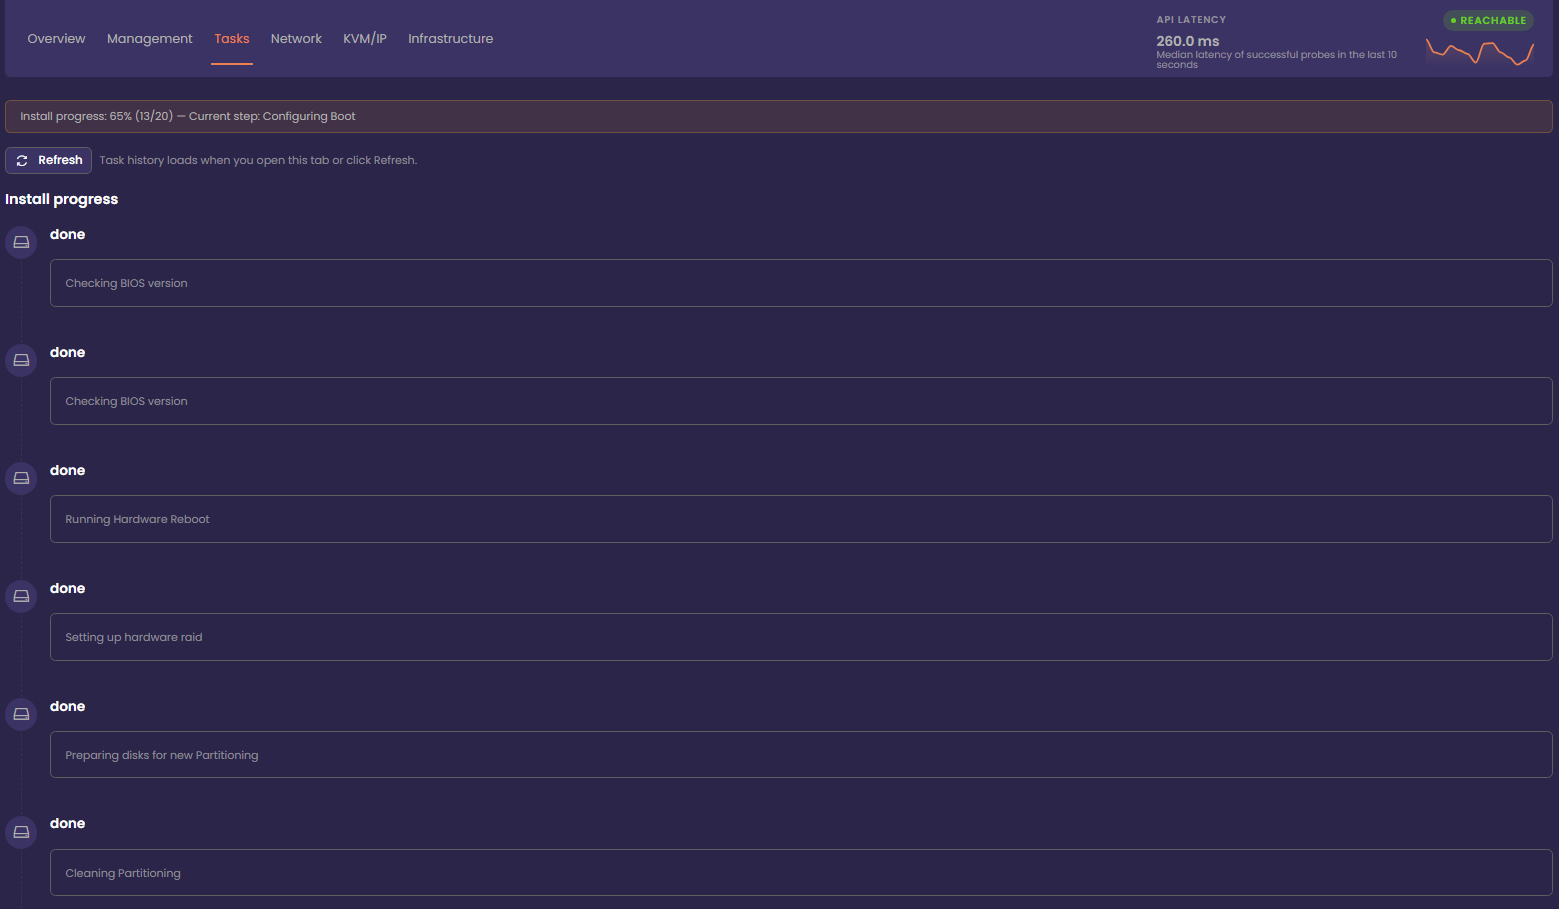
You can monitor reinstall progress from the Tasks tab, where a banner will display the current installation status in real time.
Server Tasks
Server Task Log
The task log displays a list of actions that have been performed on your server. We record tasks completed by both you and our data centre technicians. The task list is stored in your profile, and older entries are automatically replaced as new tasks are logged.
Server Network
Network
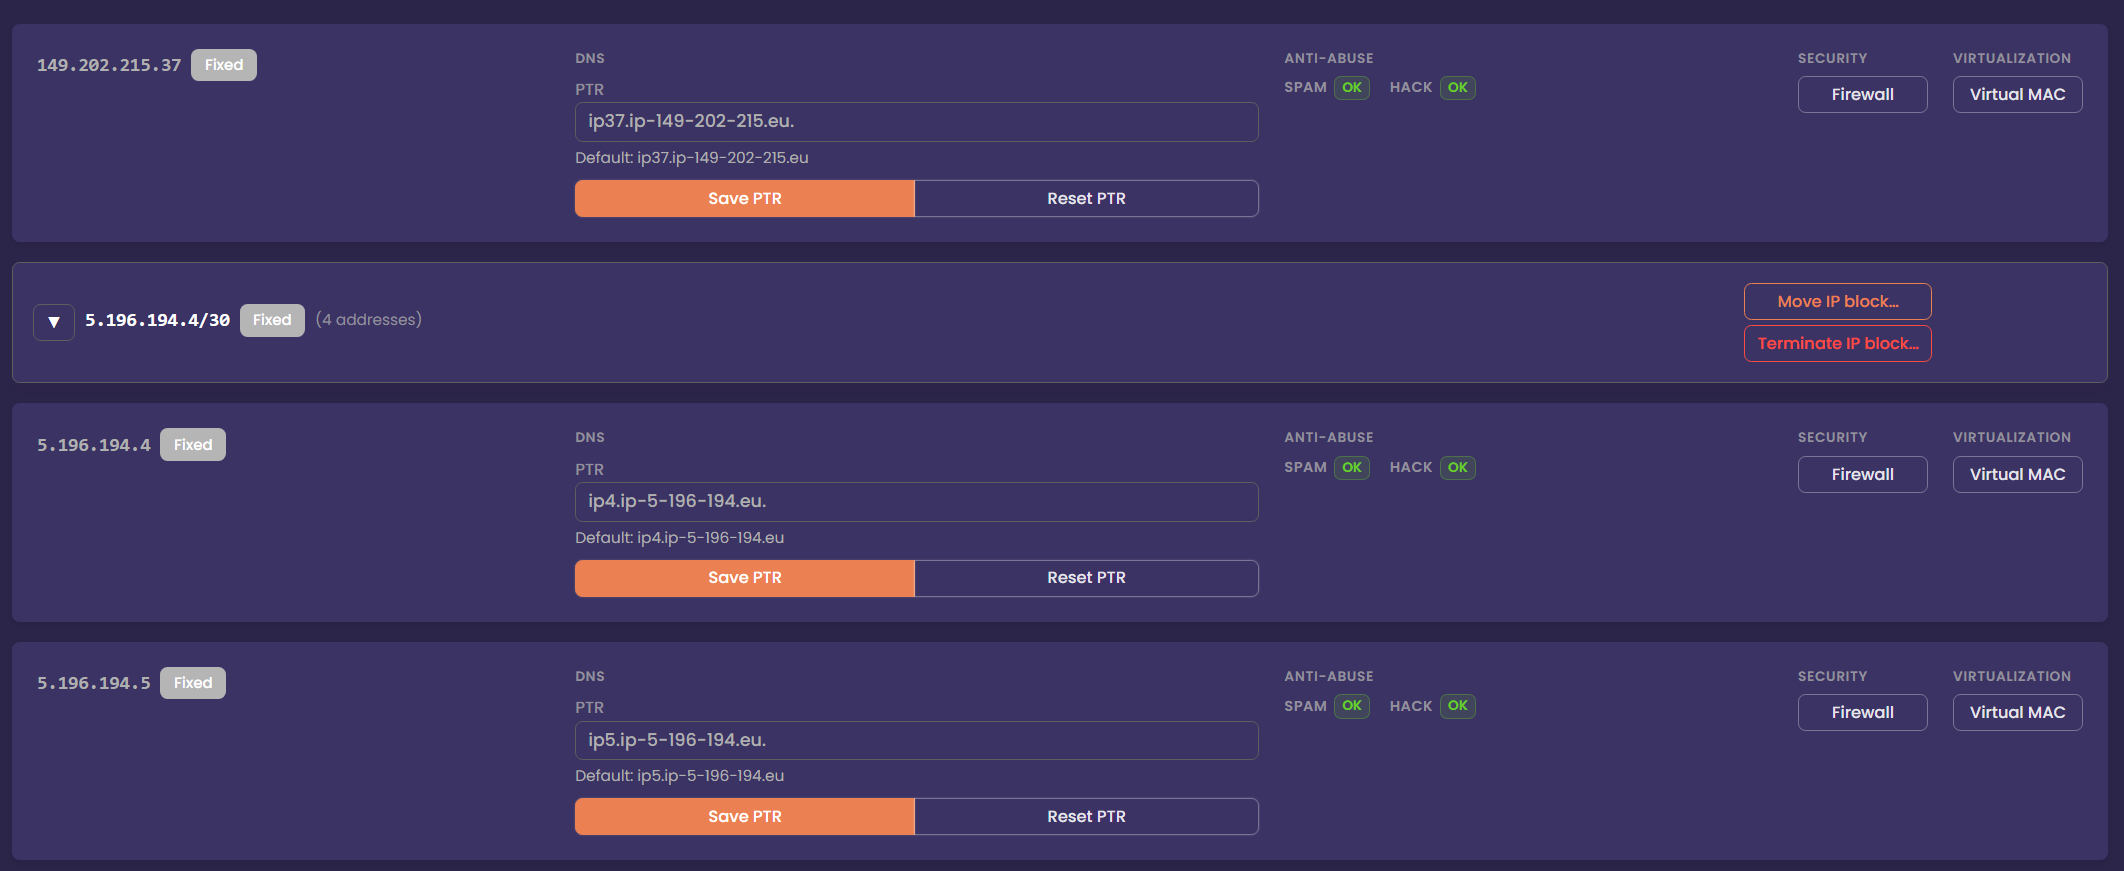
The Network tab is where you can view and manage both Fixed and Failover IP blocks assigned to your server.
A Fixed IP block is permanently bound to a single server but can be moved to other compatible servers. These addresses remain attached to the same machine at all times and are typically used for services that do not require high availability or mobility.
A Failover IP block, on the other hand, is designed for flexibility. These IPs can be attached to multiple servers simultaneously when used with a Virtual Rack. This allows you to move services between servers, build high‑availability clusters, or perform maintenance without changing your public IP addresses. When a failover block is reassigned, routing updates are applied automatically to ensure traffic reaches the correct server.
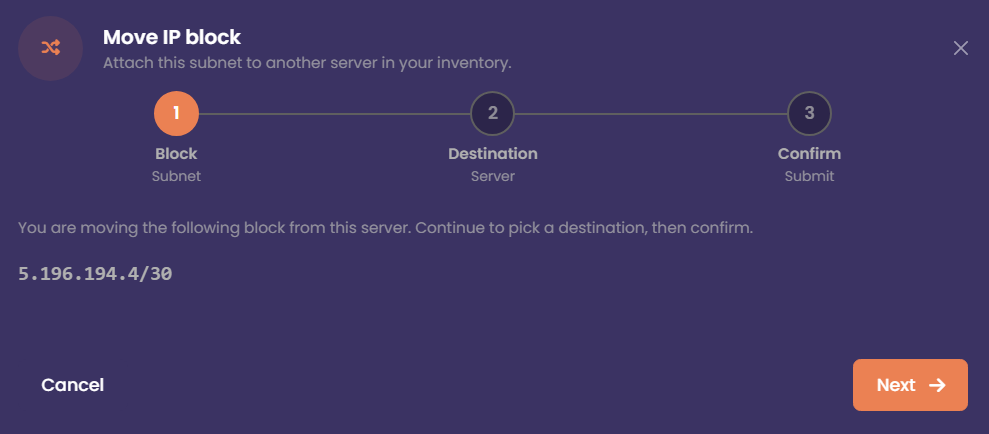
Reroute IP Blocks
If you have multiple servers, you can move Fixed IP blocks between them. Fixed blocks can be reassigned to any server within the same region, regardless of the specific zone in which it is located.
For Failover IP blocks that are part of a vRack, the rules are even more flexible. These IPs can be attached to any server within the same vRack, regardless of region or zone. This makes failover blocks ideal for high‑availability setups, load balancers, or environments where you need to move services between servers without changing public IP addresses.
Security
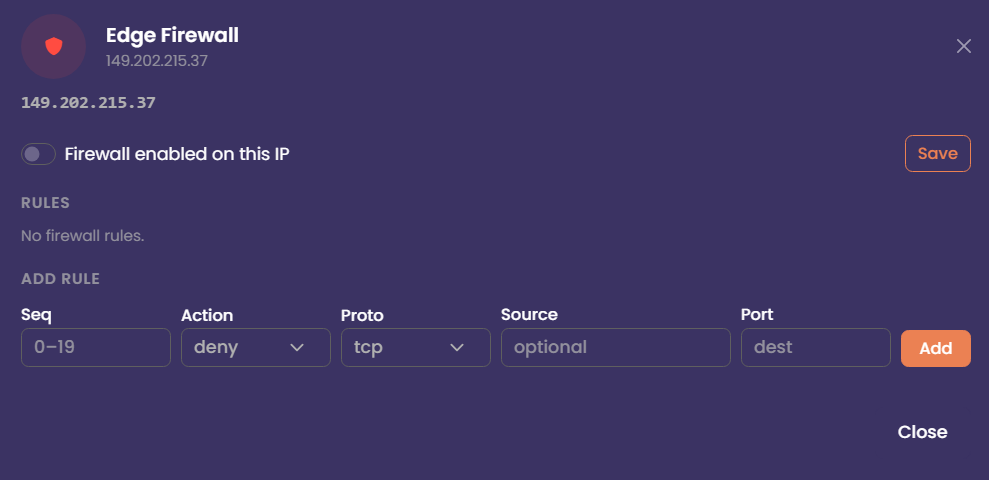
Edge Firewall
The Edge Firewall sits at the boundary of the data centre where your server is hosted. Its purpose is to protect and control incoming traffic before it reaches your infrastructure. By configuring rules on the Edge Firewall, you can block or filter connections at the network perimeter, preventing unwanted traffic from ever reaching your servers. The Edge firewall deals with incoming public traffic only.
Virtualisation / DHCP
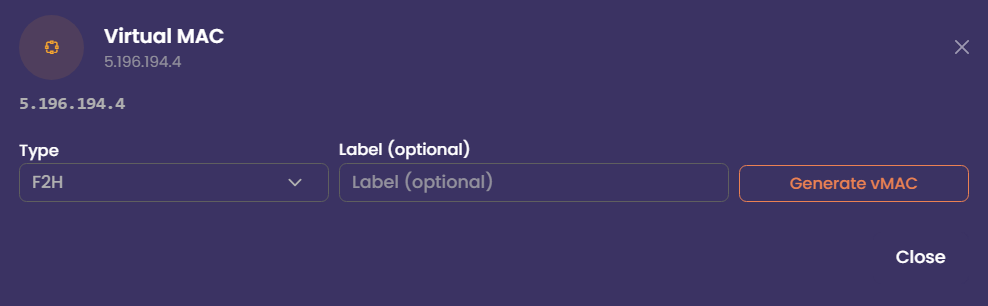
Virtual Mac Addresses
If you plan to use your server for virtualisation, you can configure networking in one of two ways: routed or bridged.
In a routed configuration, your IPs are routed directly to your server’s main IP. This is the recommended method for most hypervisors, as it avoids MAC‑address restrictions. Each virtual machine is assigned an IP from your routed block, and traffic flows through your host.
In a bridged configuration, your virtual machines appear directly on the network as if they were physical servers. This requires MAC addresses to be registered. Mac addresses can be generated from the Network tab. If you intend to use VMWARE. Use the VMWARE mac address option.
KVM/IP
KVM/IP
KVM/IP provides remote access to your physical server over the internal management network. It allows you to interact with the machine as if you were physically in front of it, making it ideal for tasks such as modifying BIOS settings or installing an operating system from an ISO.
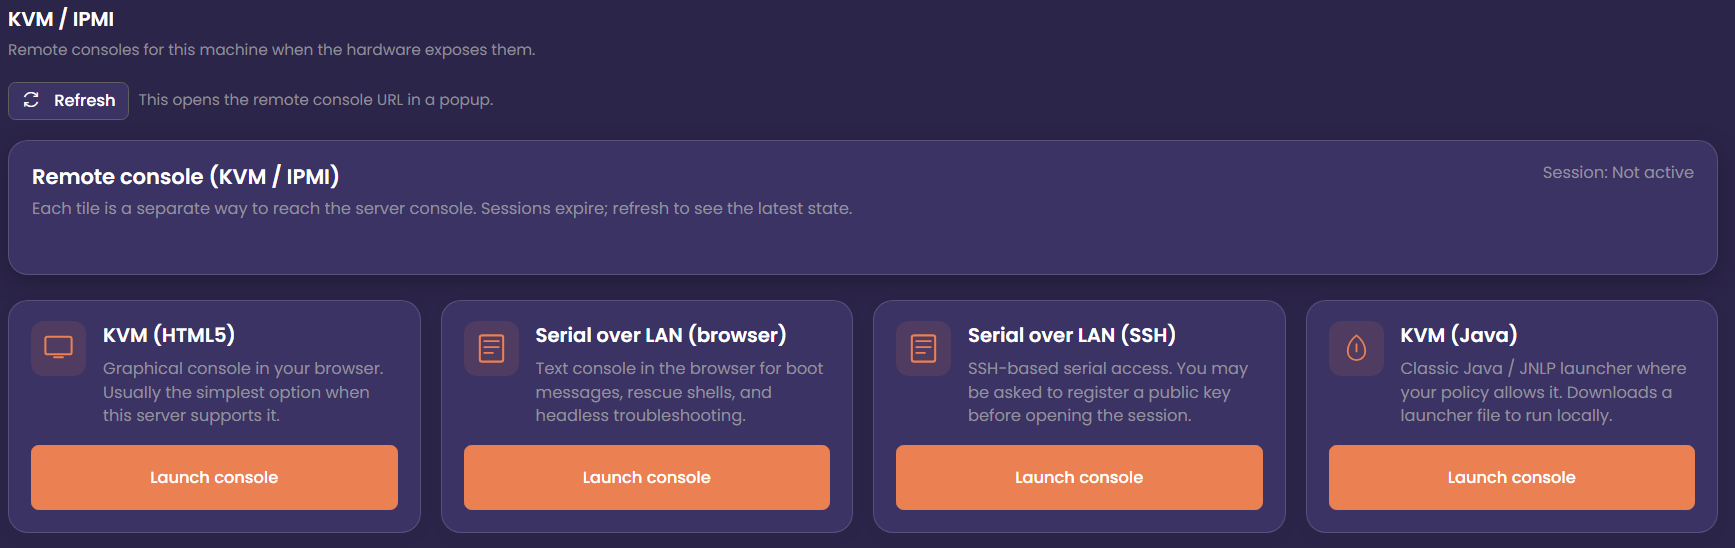
KVM HTML5
HTML5 consoles are generally the most convenient option, offering graphical access, keyboard and mouse control, and the ability to mount ISO images directly from your browser. Because they run natively in modern browsers, they avoid compatibility issues found in older Java‑based consoles and typically offer smoother performance and better security.
Serial Over LAN (SoL)
On supported servers, Serial Over LAN provides a lightweight, text‑based console that exposes the server’s serial interface over the network. It’s especially useful for environments that don’t require full graphical access, such as Linux installations, bootloader troubleshooting, or low‑bandwidth remote management. SoL remains responsive even when the system is under heavy load or when graphical consoles fail to initialise.
Java Console
Some servers also offer a Java‑based remote console. This provides a full graphical interface similar to traditional KVM/IP, allowing you to view the screen output, interact with the BIOS, and mount ISO images. While older in design, the Java console can be a reliable fallback when browser‑based KVM/IP options are unavailable or incompatible with certain hardware generations.
Virtual Rack
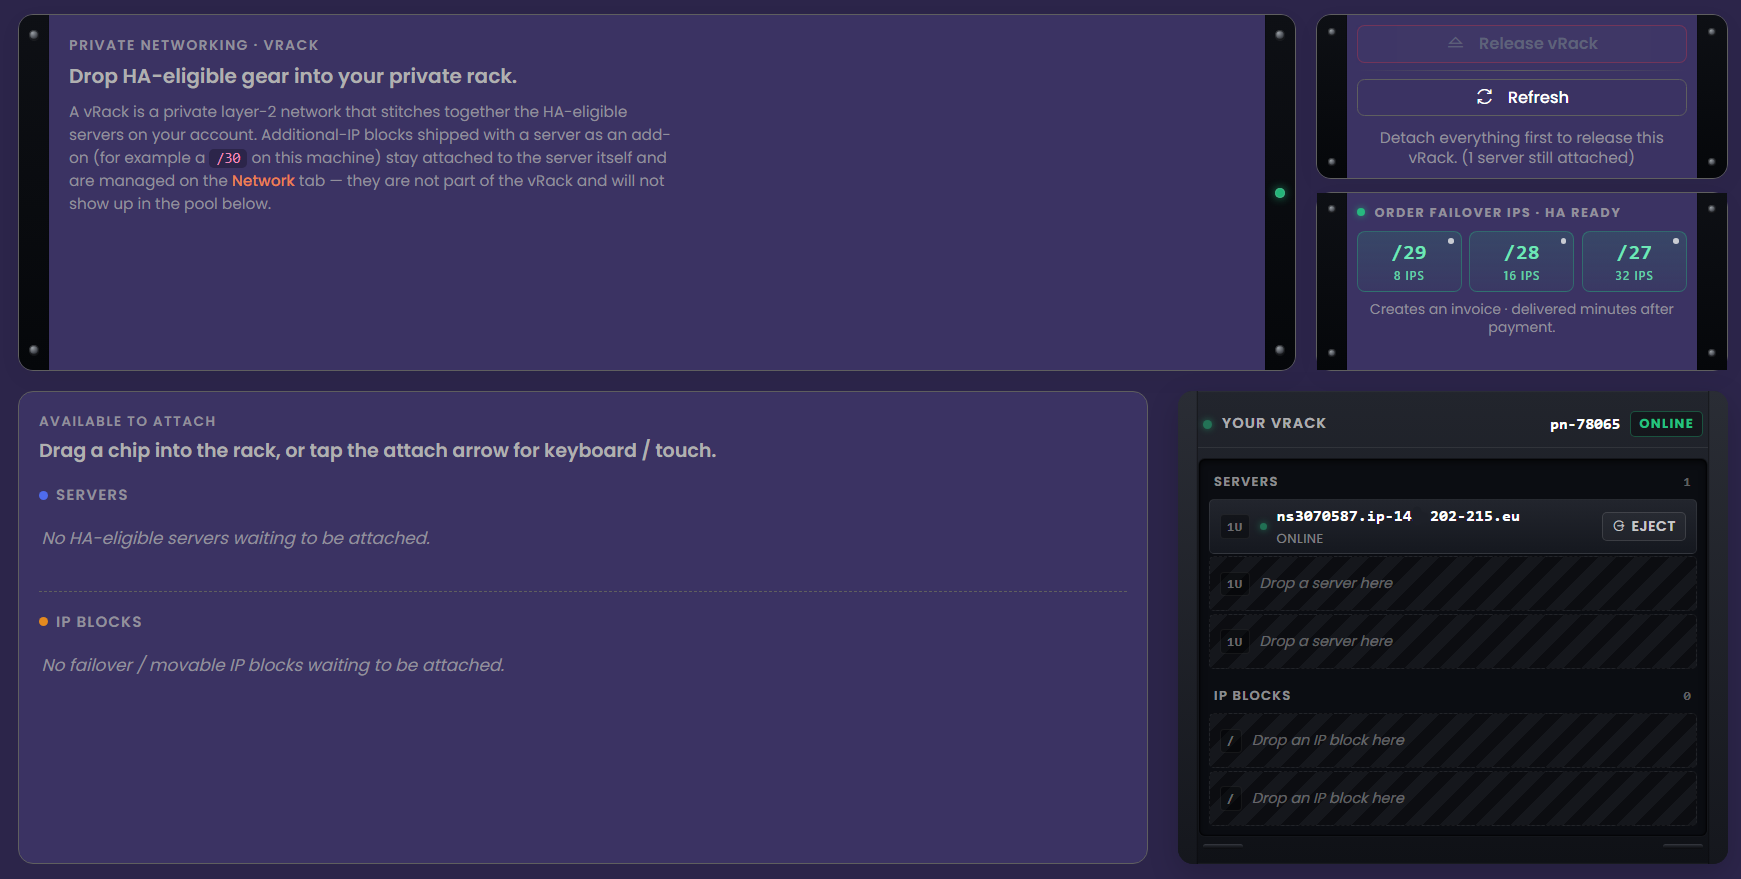
vRack
You must have two or more servers to use vRacks
On supported servers, you can order a Virtual Rack (vRack) and place your infrastructure inside it. A vRack allows you to interconnect your servers and IP blocks over a secure, private Layer‑2 network. This makes it possible to build private clusters, internal networks, and multi‑server architectures without exposing traffic to the public internet.
A vRack can span multiple datacentres and even multiple countries, allowing you to link servers across regions as if they were on the same local network. When combined with Network Attached Storage (NAS). vRack becomes a powerful tool for building high‑availability environments.
Only Failover IP blocks can be placed into a vRack. These can be ordered from the Infrastructure tab or directly from your client area at: https://my.f2h.cloud. IP delivery is automated after payment.
IP Address Management
IP Address Management
Within the IP Address Management section, you can manage all IP addresses assigned to your F2HCloud services. This includes viewing, organising, and configuring both Fixed and Failover IP blocks associated with your infrastructure.

All Virtual Server, Cloud Server, and Dedicated Server customers have access to this feature. From here, you can review routing details, attach or detach IP blocks, and manage how your addresses are allocated across your services. By selecting an IP address from your pool, you can manage advanced features.
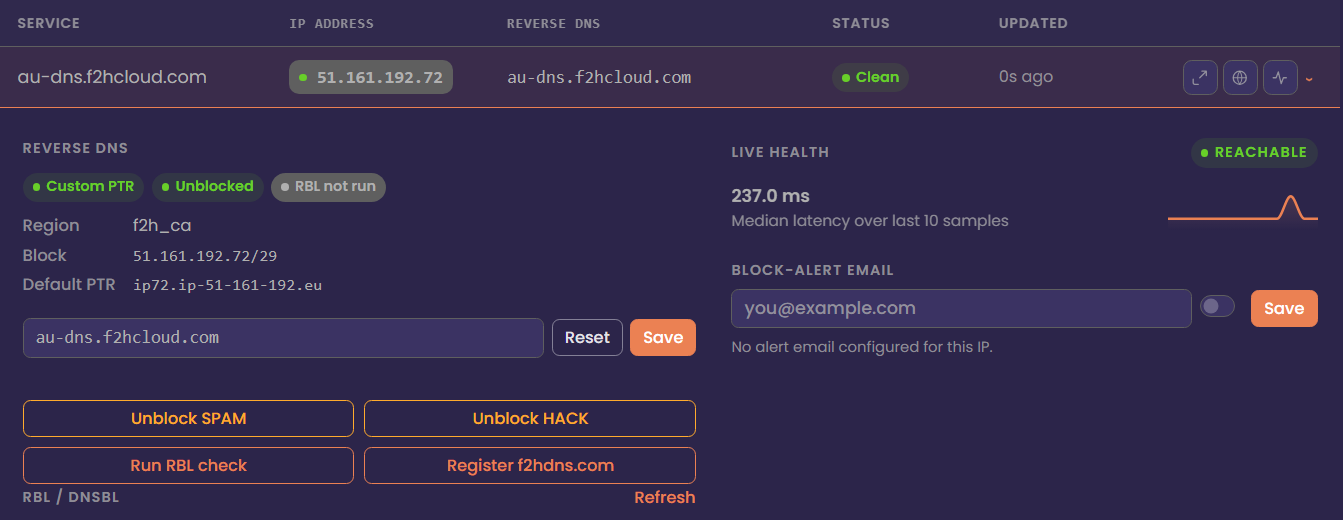
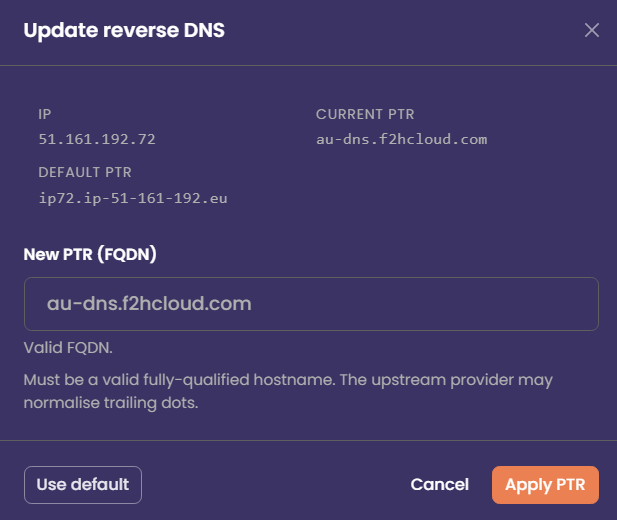
IP rDNS/PTR Records
PTR records are essential for customers who intend to send email from their server. Without a valid PTR record, your messages are far more likely to be delivered to junk folders—or rejected entirely. Many mail providers and spam‑filtering systems require a matching forward and reverse DNS entry, and the absence of a PTR record can also lead to your IP address being listed on RBLs such as Spamhaus.
You can configure a PTR record by selecting the IP address within the IP Address Management section and clicking the Update PTR icon on the right. Changes usually propagate quickly, but some mail providers may take additional time to recognise the update.
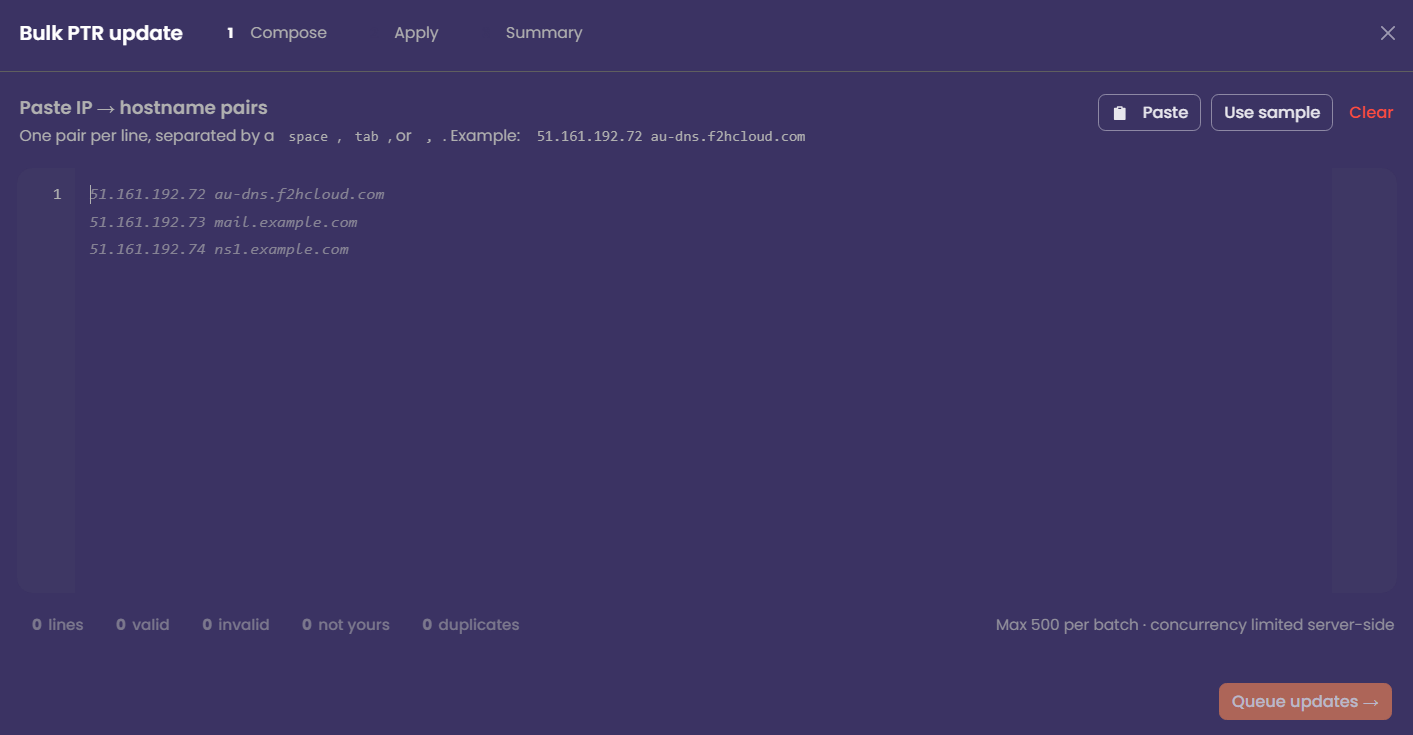
Bulk Update rDNS/PTR Records
Using the Bulk PTR Updater, you can update up to 500 PTR records at a time. As the task runs, the worker will display real‑time progress so you can monitor how many records have been processed.
Any entries that contain invalid or incorrectly formatted PTR values will be flagged for your review. This allows you to quickly identify and correct problematic records without interrupting the rest of the update process.
Unblock Spam Protection
To help ensure that customer IP addresses do not become listed in RBL databases, we use an AI‑driven system to classify outgoing mail. This system analyses patterns, volume, and message characteristics to detect potential spam activity in real time.
If the Antispam system identifies spam being sent from an IP address, port 25 will be automatically blocked for that IP. This prevents further mail from leaving the server and helps protect the reputation of your IPs before they are listed on services such as Spamhaus.
Once you have identified and resolved the issue—such as removing compromised scripts, securing accounts, or stopping abusive traffic—you can release the port 25 block directly from The NOC. If you configure an email address in the NoC, we will notify you if port 25 is blocked.
Unblock Hack Protection
Similar to the spam‑protection system, Hack Protection automatically locks your server if abnormal or malicious traffic is detected. In the event that your server becomes compromised, this protection helps safeguard your data by preventing further access until you are able to secure the system.
After the lock is triggered, you can use the KVM/IP console to connect directly to the server and investigate the issue. Once you have resolved the underlying problem—such as removing malware, patching vulnerabilities, or securing exposed services—you can unblock the affected IP to restore public access.
RBL Checks
You can check the reputation of your IP address against a common list of more than 30 RBL (Real‑time Blackhole List) databases directly from The NOC. This allows you to quickly identify whether your IP has been flagged for spam‑related activity or other forms of abuse.
If your IP address is listed in an RBL, you are expected to delist it and ensure the underlying issue is resolved so it does not become listed again. Maintaining the health and reputation of your IP space is the responsibility of the customer, and consistent good behaviour is required to “earn” a clean IP reputation over time.
Register F2HDNS Records
F2HDNS is our in‑house DNS platform, providing private and reliable DNS services for all F2HCloud customers. It allows you to create and manage DNS records for your infrastructure without relying on external providers.
Many networks—especially corporate environments—block direct access to raw IP addresses for security reasons. F2HDNS removes this barrier by allowing users to connect to your services using a fully qualified domain name (FQDN) instead of an IP. This improves compatibility, security, and accessibility across a wide range of networks and devices.
API Activity
Within the API Activity screen, you can view an audit log of the most recent jobs handled by the API. This includes details such as the action performed, the time it was executed, and the status of each task. The activity log provides a clear overview of automated operations, helping you track changes, troubleshoot issues, and verify that API‑driven workflows are running as expected.

F2HCloud API
F2HCloud API
F2H API access is currently experimental and should not be used with production systems.
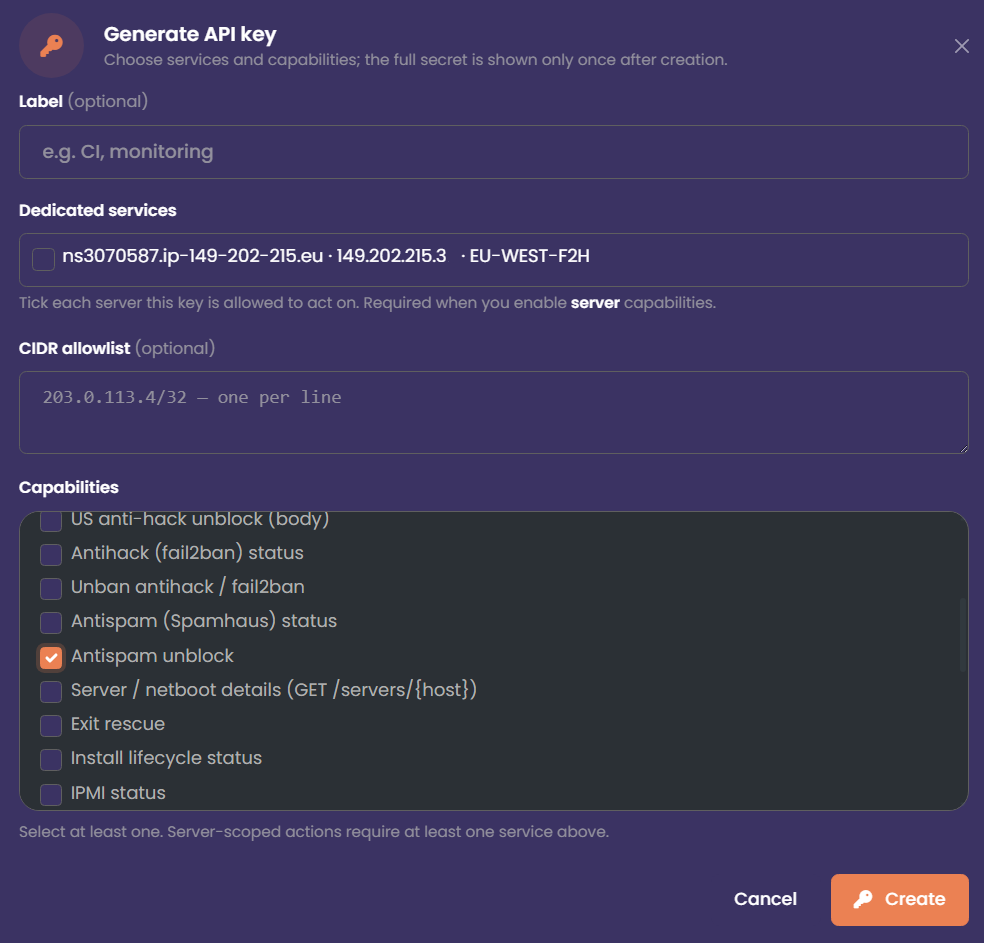
By using scoped API keys, you can allow specific API functions to be performed without needing to be logged into The NOC. Scoped keys provide fine‑grained control over what actions an external system, script, or integration is allowed to perform.
You can generate an API key and assign it to a specific server. Once created, you can choose exactly which permissions that key is allowed to use—such as managing IPs, updating PTR records, performing server actions, or accessing monitoring data. This ensures that each key only has the minimum level of access required for its intended task, improving both security and automation flexibility.
Reboot Using The API
An example API call using cURL to reboot your server is shown below. The API key used must include the reboot permission within its assigned scope.
curl -sS -X POST 'http://ca-api-01.f2hcloud.uk:8000/api/servers/ns0000000.ip-000-000-000.eu/reboot' -H 'X-API-Key: f2h.deadbeefcafebabe.Example0Replace0With0Your0Real0Key0Here'Swagger API
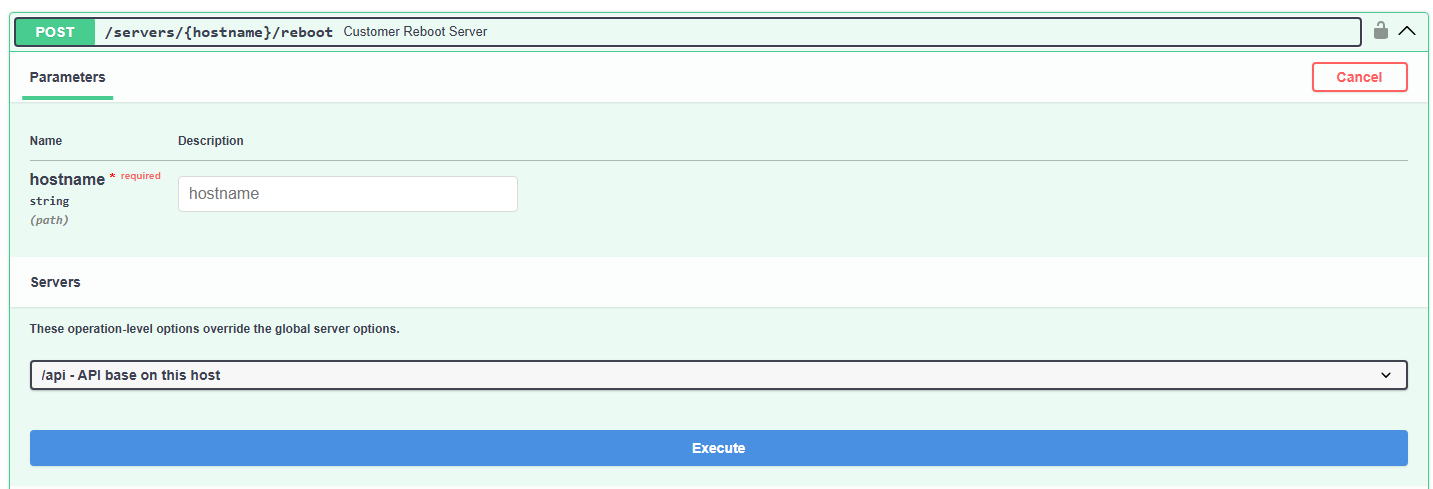
Swagger access is currently experimental and should not be used with production systems.
Swagger provides a GUI (Graphical User Interface) to allow users to quickly perform API tasks from a browser. Using scoped API keys on one of the supported API servers will allow you to control your server from any browser.