# Technical Guides
Learn how to use vRack, Failover IPs and more.
# Configure IPv4 IPs & Subnets
If you’ve purchased any additional IPv4 addresses for your service, Fixed or Failover. These will need to be configured **inside your server**. We only configure the main server IPv4 on our side.
The correct method for adding extra IPs or subnets depends on the operating system you’re using, as each distribution handles network configuration differently.
#### Red Hat Enterprise Linux (RHEL / AlmaLinux / RockyLinux)
Do not use eth0-x files to configure additional IPs or Subnets in your server. No support is provided for servers using eth0-x files.
On the First2Host network, your primary network interface is usually **eth0**, as shown below.
[](https://docs.f2h.cloud/uploads/images/gallery/2026-05/nmcli-additional-ips-jpg.webp)
Copy the **UUID** of the interface, then run the command below, replacing the example UUID with your own.
```
nmcli connection edit 5fb06bd0-0bb0-7ffb-45f1-d6edd65f3e03
```
You can view the currently assigned IPv4 addresses using the **print** command. In most cases, you’ll only see your virtual server’s main IPv4 address.
```
print ipv4.address
```
To configure additional **IPv4** or **IPv6** addresses, you can use the `set ipv4.address` and `set ipv6.address` commands.
```
set ipv4.address
```
In the console, specify all of the IPv4 addresses you want to configure on the server. Make sure each IPv4 address is separated by a comma.
```
51.xXx.149.x, 91.xXx.173.172, 137.xx.49.2X2, 198.xXx.4.8
```
Once you’ve added all of your IPv4 or IPv6 addresses, run **save** and then **quit**. After that, reboot the server to ensure the configuration is fully applied.
#### Ubuntu / Debian
In **Ubuntu** and **Debian** servers, you use **Netplan** to configure any additional IPs and subnets. It’s very important to maintain the correct indentation in the file — if the spacing is incorrect, your network configuration will fail.
For that reason, always run `netplan try` before applying the changes. This allows you to confirm the configuration is valid and automatically rolls back if something is wrong.
The Netplan configuration file is located at`/etc/netplan/50-cloud-init.yaml`. Its default form is below.
```
network:
version: 2
ethernets:
eth0:
match:
macaddress: "bc:24:11:42:df:88"
addresses:
- "5.175.67.192/27"
- "2001:41d0:203:5ca7::14/117"
nameservers:
addresses:
- 213.186.33.99
- 8.8.8.8
- 2001:4860:4860::8888
search:
- f2hdns.com
set-name: "eth0"
routes:
- on-link: true
to: "default"
via: "51.198.88.215"
- to: "default"
via: "2001:41d0:209:5ca7::2"
```
To configure further IPv4 on your server. Just add further IPs to the `addresses` section.
```
network:
version: 2
ethernets:
eth0:
match:
macaddress: "bc:24:11:42:df:88"
addresses:
- "5.175.67.192/27"
- "149.209.35.24/32"
- "5.135.4.231/32"
- "2001:41d0:203:5ca7::14/117"
nameservers:
addresses:
- 213.186.33.99
- 8.8.8.8
- 2001:4860:4860::8888
search:
- f2hdns.com
set-name: "eth0"
routes:
- on-link: true
to: "default"
via: "51.198.88.215"
- to: "default"
via: "2001:41d0:209:5ca7::2"
```
Once finished, issue **netplan try** and **netplan apply to apply the network configuration to your servers.**
# Order & Configure vRack With Private Networking
#### vRack Overview
**vRack** is a private Layer‑2 networking feature that allows you to interconnect multiple servers across the First2Host network using an isolated, non‑routed VLAN. It behaves like a virtual switch that spans racks, datacentres, or even regions (depending on your deployment), giving your servers a secure and dedicated internal network.
##### Core Characteristics
- **Layer‑2 private network:** vRack operates at Layer 2, meaning your servers appear to be on the same virtual switch regardless of their physical location.
- **Isolated VLAN per customer:** Each vRack is assigned a unique VLAN ID, ensuring traffic isolation from other customers.
- **No public routing:** Traffic inside the vRack never touches the public internet. It is not NATed, filtered, or rate‑limited.
- **Supports IPv4 and IPv6:** You can assign private IPv4 ranges (e.g., 10.0.0.0/24) or IPv6 ULA ranges to your internal network.
- **Cross‑server communication:** Ideal for clusters, load balancers, database backends, storage nodes, and any architecture requiring east‑west traffic.
##### How vRack Works
When a vRack is ordered and attached to your server:
1. **A private interface is created:** Usually named `eth1` or `ensX` Depending on the OS and NIC enumeration.
2. **A VLAN tag is applied:** Your server receives a dedicated VLAN ID that isolates your private network.
3. **You assign your own private IPs:** We do not configure private addressing for you — you choose the subnet and configure it inside the OS.
4. **Traffic flows only between servers in the same vRack:** No routing to the public interface occurs unless you explicitly configure it.
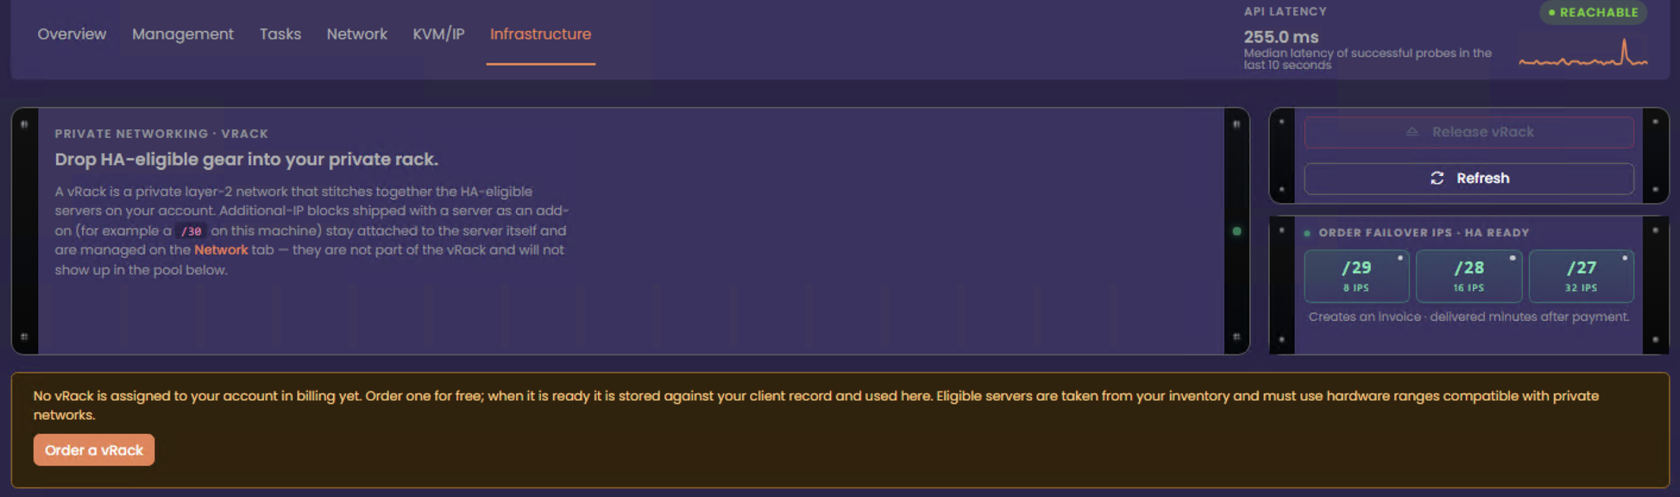
#### Order vRack
You can order a vRack when you have **two or more High Availability–compatible servers** in your account. Servers that support High Availability are labelled **“HA”**.
[](https://docs.f2h.cloud/uploads/images/gallery/2026-05/vrackorder.png)
Your vRack order is delivered immediately. Your vRack number is shown on the right, and the eligible services that can be added to the vRack are listed on the left. To use vRack, add the servers and, optionally, any public IPv4 blocks available to move into the vRack. Only failover IPs can be moved to your vRack, and only failover IPs will be displayed here.
[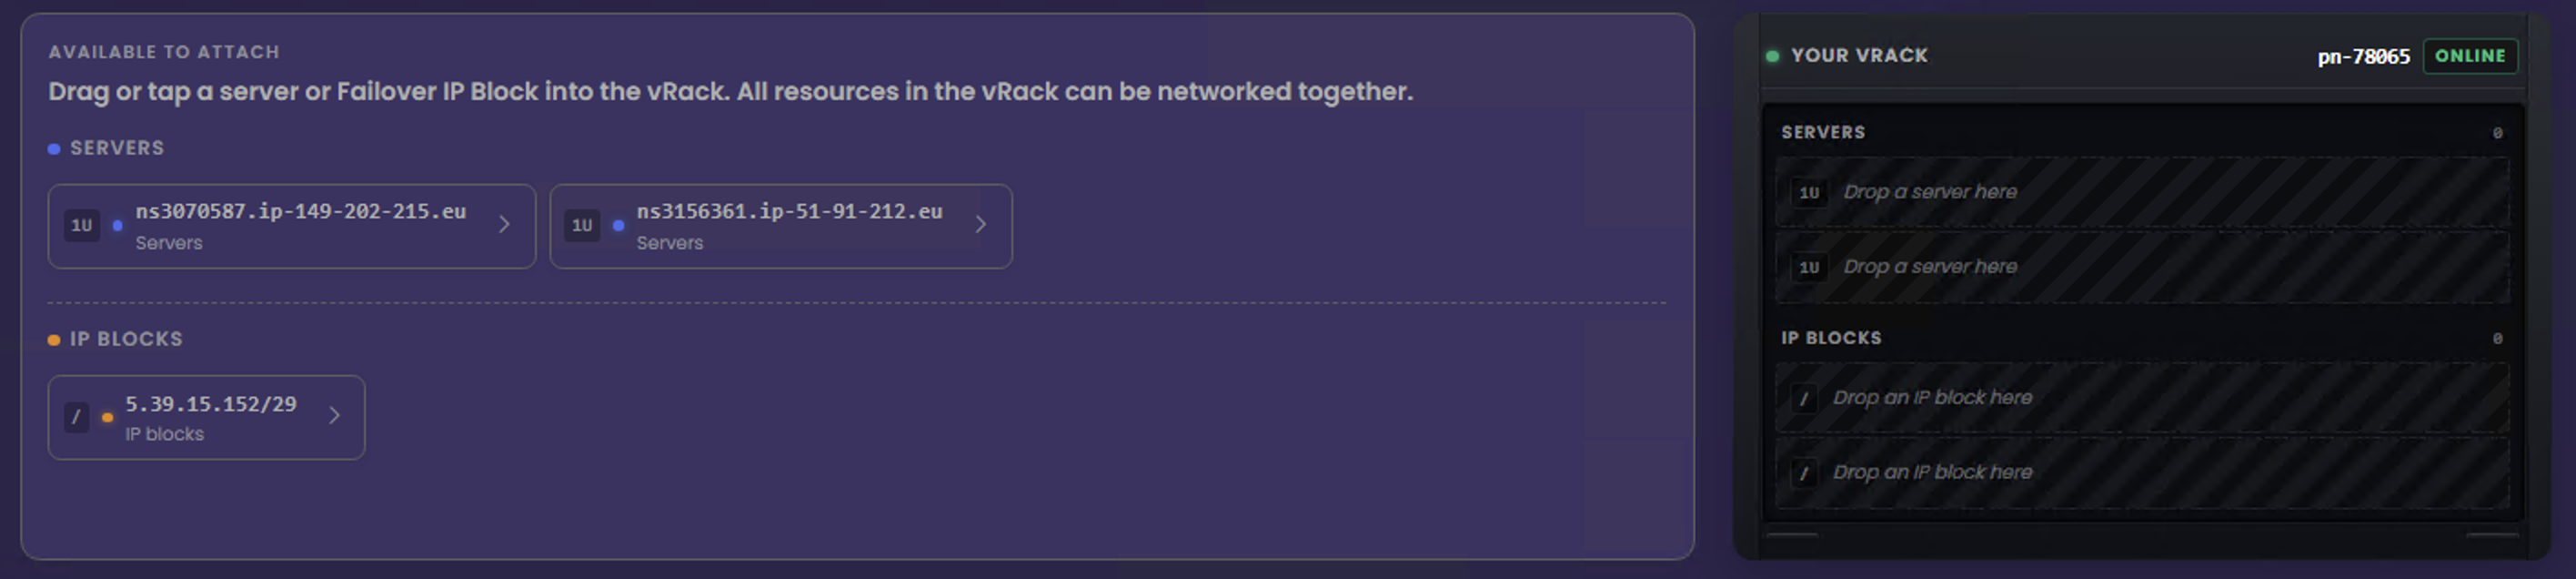](https://docs.f2h.cloud/uploads/images/gallery/2026-05/vrack-servers.png)
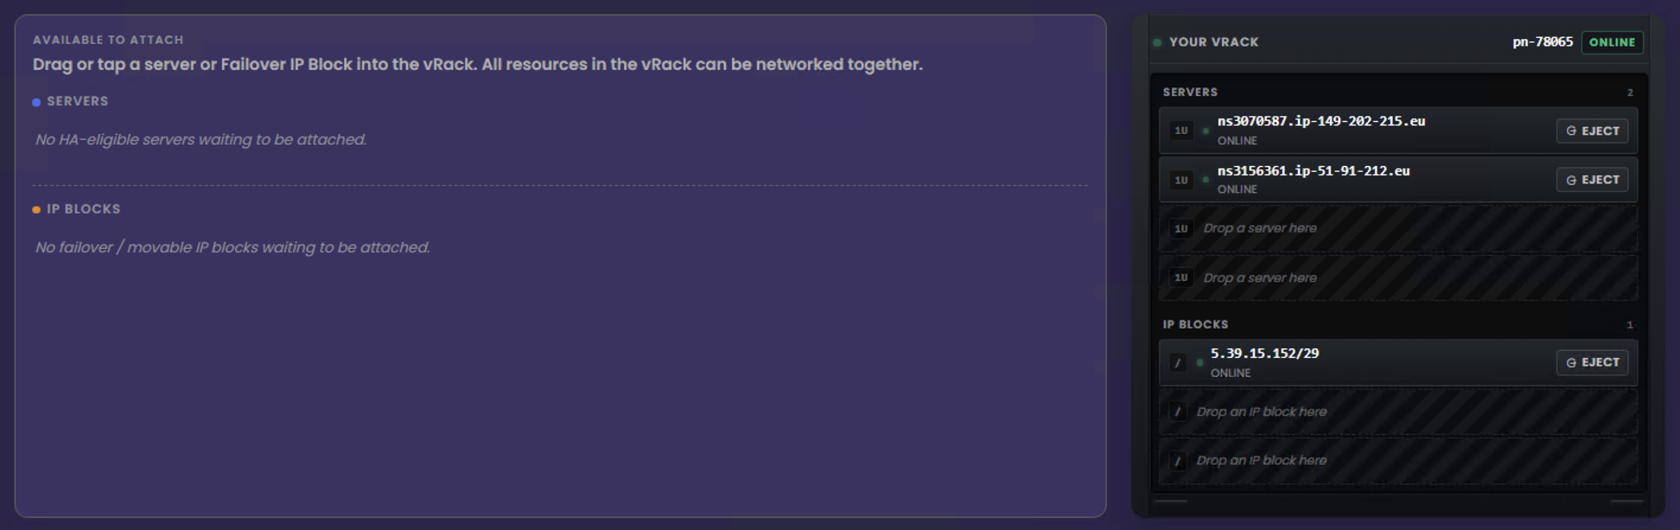
##### vRack Ready
Once you’ve added your infrastructure to your vRack, we will link your resources together on the private network. However, you must still configure the network settings inside your servers.
[](https://docs.f2h.cloud/uploads/images/gallery/2026-05/vrack-servers-ips.png)
- Configure private networking in vRack
- Configure Failover IPs in vRack
# Configure Private Networking In vRack
#### Overview
With vRack, you can interconnect servers in **any location worldwide** over a private Layer‑2 network. This means servers in Europe can securely communicate with servers in Australia, Singapore, or anywhere else in your global infrastructure.
Behind the scenes, when you add your infrastructure to your vRack, we provision a **private VLAN** for your account. This allows your servers to communicate over our global backbone while remaining completely isolated from the public internet. So how do you take advantage of this?
First, choose an internal range. You may use 10.0.0.0/16, 192.0.0.0/16 or 172.0.0.0/16.
#### Configure Internal Interfaces
After adding a server to your vRack, you’ll notice that a new network interface becomes available. You can view this by running `ip a`. The interface is usually deployed as `eno2`, but the exact name depends on the underlying hardware.
```
4: eno2: mtu 1500 qdisc mq state UP group default qlen 1000
link/ether d0:50:99:dc:f3:75 brd ff:ff:ff:ff:ff:ff
altname enp4s0f1
altname enxd05099dcf375
```
##### RHEL 10 / AlmaLinux 10 / RockyLinux 10
In **RHEL 10**, we use **NMCLI**, the command‑line utility for NetworkManager, to configure the second interface. As root, check the current network status. You should see that `eno2` is listed but currently **disconnected**.
```
nmcli device status
```
To add your second NIC to NetworkManager, use the command below to create a new connection profile. Replace `eno2` with the name of your second interface, as shown in `ip a`, and replace `Private_Network` with your own network name.
```
sudo nmcli connection add type ethernet con-name Private_Network ifname eno2
```
If you check `nmcli device status` Now, you’ll notice that the connection shows as **“connecting”**. The next step is to assign an IP address to the connection. Replace `Private_Network` with the network name you created earlier, and replace `172.0.0.1/24` with your own internal range.
```
nmcli connection modify Private_Network IPv4.address 172.0.0.1/24
```
Now set the connection to **manual** so it does not attempt to obtain an address automatically. Replace `Private_Network` with the network name you created earlier.
```
nmcli connection modify Private_Network IPv4.method manual
```
Finally, make the configuration **persistent across reboots** so the connection is restored automatically whenever the server starts. Replace `Private_Network` with the network name you created earlier,
```
nmcli connection modify Private_Network connection.autoconnect true
```
After restarting NetworkManager, you’ll see that your second NIC is now configured with the new internal IP address.
```
systemctl restart NetworkManager
```
Repeat this process on your other servers, assigning a **unique internal IP address** to each one. Your servers will now be able to communicate with each other over the private network you’ve created.
##### RHEL 8/9 / AlmaLinux 8/9 RockyLinux 8/9
Check `ip a` for the name of the second interface after you have added your servers to the vRack. Create the following configuration file using the correct interface name from `ip a`.
```
nano /etc/sysconfig/network-scripts/ifcfg-NETWORK_INTERFACE
```
Inside the file, paste the following configuration block. Replace `172.0.0.1/24` with your own internal range, and replace `eno2` with the name of your second interface.
```
DEVICE=eno2
BOOTPROTO=static
IPADDR=172.0.0.1/24
NETMASK=NETMASK
ONBOOT=yes
TYPE=Ethernet
```
Now restart NetworkManager
```
systemctl restart NetworkManager.service
```
Repeat this process on your other servers, assigning a **unique IP address from your internal range** to each one.
##### Ubuntu 24 / Debian 12 + 13
To configure vRack on Debian‑based distributions of 13+, we use **Netplan** to add and configure the second interface. Open the `50-cloud-init.yaml` file and locate the line that begins with `version: 2`.
```bash
nano /etc/netplan/50-cloud-init.yaml
```
Directly under this line, add the following code block, making sure the indentation is preserved exactly. YAML is indentation‑sensitive, so even a single misplaced space will cause Netplan to fail. Ensure you switch the IP block for your internal range.
```
ethernets:
NETWORK_INTERFACE:
dhcp4: false
addresses:
- 172.0.0.1/24
```
Save and reload Netplan.
```
netplan apply
```
Repeat this process on your other servers, assigning a **unique IP address** from your internal range to each one.
##### Ubuntu 22 / Debian 11
Using nano, open up the current networking file.
```bash
/etc/network/interfaces.d/50-cloud-init
```
Add the following line, replacing `INTERFACE_NAME` with the name of your second interface and swapping the internal IP range for your own.